1. Running the Simulator
This section outlines three simulator configurations that allow you to test new code without connecting physical hardware. Each setup validates a different part of the system.
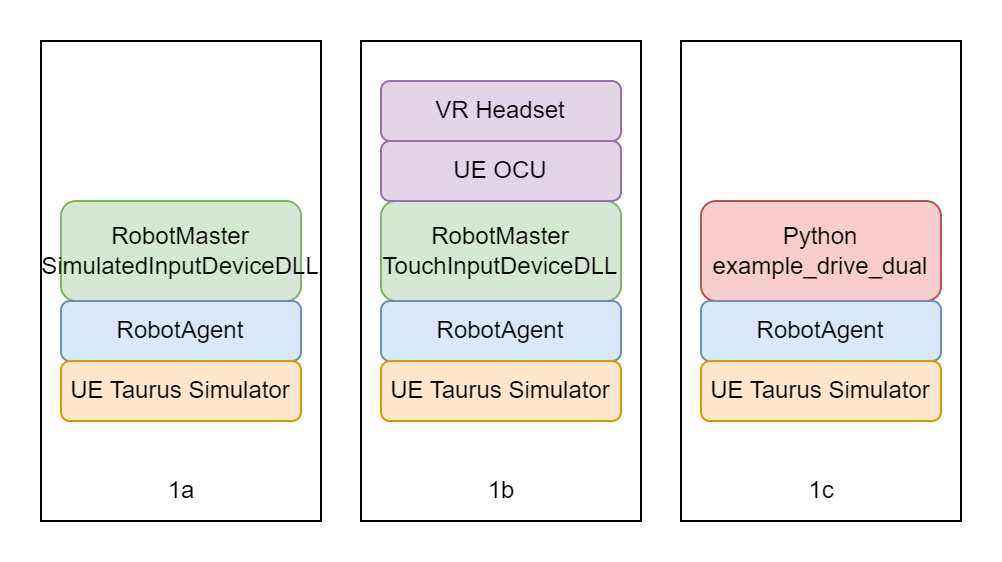
1a. Simulated Control
This is the simplest configuration for verifying that the software components are functioning correctly.
Required Equipment
- Laptop with an NVIDIA graphics card
Configuration Steps Open the following files and update the specified parameters. Use Ctrl+F to locate lines quickly.
RobotOCUAndRobotSim_Release\bin\RobotAgent.prp:
# Pick the arm you want to use
RobotDefinitionFilePath = RealManDefinitionFiles
RobotDefinitionFileName = RealMan_RM65.prp

# use the UDP card
WithUDPmsgMC = 1

# dont disable either arm
SimulateLeftArm = 0
SimulateRightArm = 0

# UDP settings
UDPmsgMCLocalIPAddress = 127.0.0.1
UDPmsgMCRemoteIPAddress = 127.0.0.1
UDPmsgMCReceiveLocalPortLeft  = 12001
UDPmsgMCSendRemotePortLeft    = 12002
UDPmsgMCReceiveLocalPortRight = 12011
UDPmsgMCSendRemotePortRight   = 12012

# disable grippers
UsingRobotiqTwoFingerGripper = false
UsingRobotiqThreeFingerGripper = falseRobotOCUAndRobotSim_Release\bin\Master.prp:
# has to have same arm as agent
RobotDefinitionFilePath = RealManDefinitionFiles
RobotDefinitionFileName = RealMan_RM65.prp

UseDesignatedInputDeviceDLL = 1

DesignatedInputDeviceDLL = SimulatedInputDeviceDLL
UseRealFootPedal = 0
UseSimulatedPedal = 1RobotOCUAndRobotSim_Release\Helpers\RunRobotSimulation.bat:
UnrealSim\WindowsNoEditor\Taurus_UE27_Sim\Binaries\Win64\Taurus_UE19_Sim-Win64-Shipping.exe Robot_RM65_UDPRunning the Simulator
Double-click
RobotOCUAndRobotSim_Release\Run Taurus Sim.bat. RobotAgent and UE Simulator will start.Double-click
RobotOCUAndRobotSim_Release\Run Master.bat. Robot Master will start.With master console window selected. press 'A' to bring the robot to approach pose.
With master console window selected. Press 'R' to bring the robot to Ready pose. In the UE Simulator, the arms will start moving immediately.
1b. VR Control
This configuration validates the VR-based Operator Control Unit (OCU) and control pipeline.
Required Equipment
- Laptop with an NVIDIA graphics card
- VR headset (tested with Oculus Quest 2 and Quest 3)
Configuration Steps
Start with the configuration from section 1a, then update the following: Additionall, make these changes in file RobotOCUAndRobotSim_Release\bin\Master.prp
# use the touch controllers instead of simulated device
DesignatedInputDeviceDLL = TouchInputDeviceDLL

# disable simulated pedal, do NOT enable real pedal - we are using the VR controller button.
UseRealFootPedal = 0
UseSimulatedPedal = 0

# we want the camera to be ego-centric, so lets redefine the matrix.
Camera1_Frame0 = -1.00000,         0.00000,         0.00000,         0.0000
Camera1_Frame1 =  0.00000,        -1.00000,         0.00000,         0.0000
Camera1_Frame2 =  0.00000,         0.00000,         1.00000,         0.0000
Camera1_Frame3 =  0.00000,         0.00000,         0.00000,         1.0000
Run
Connect the VR headset to the PC and enter Quest Link. The headset should be inside the Link menu, with a grey grid extending into infinity.
Double-click
RobotOCUAndRobotSim_Release\Run Taurus Sim.bat. RobotAgent and UE Simulator will start.Double-click
RobotOCUAndRobotSim_Release\Run MasterPipe.bat. Robot Master will start, with the connection to Unreal engine ready.RobotOCUAndRobotSim_Release\Run OCU Only.batto start the OCU.In VR goggle's Quest Link Window, wait for the menu to load. Click the approach button to bring the simulator to approach and then click the Normal Mode button to bring it to Ready.
Press and hold the X button on your left controller to engage the clutch. Move the arms around and such.
1c. Python API Control
This configuration demonstrates how to use the Python API to replace Robot Master for control.
Required Equipment
- Laptop with an NVIDIA graphics card
Configuration Steps
Use the same configuration as in section 1a. Then:
Install Conda on Windows from https://www.anaconda.com/download
Open Conda shell and cd into
xrgo_core/hrc-dexmanIn
xrgo_core/hrc-dexmanrun the following command to install the conda environment
conda env create -n xrgo -f env_windows.yaml
conda activate xrgo
pip install ../xrgo_interface
pip install ../xrgo_lfd
pip install ../dexman_policy
Running the Simulator
Double-click
RobotOCUAndRobotSim_Release\Run Taurus Sim.bat. RobotAgent and UE Simulator will start.Run
SuperDex_interface\demo\example_drive_dual.py, using the Conda environment created above.
