2. Teleoperating the Real Robot
This section describes how to connect and control the real robot hardware in both local and remote setups.
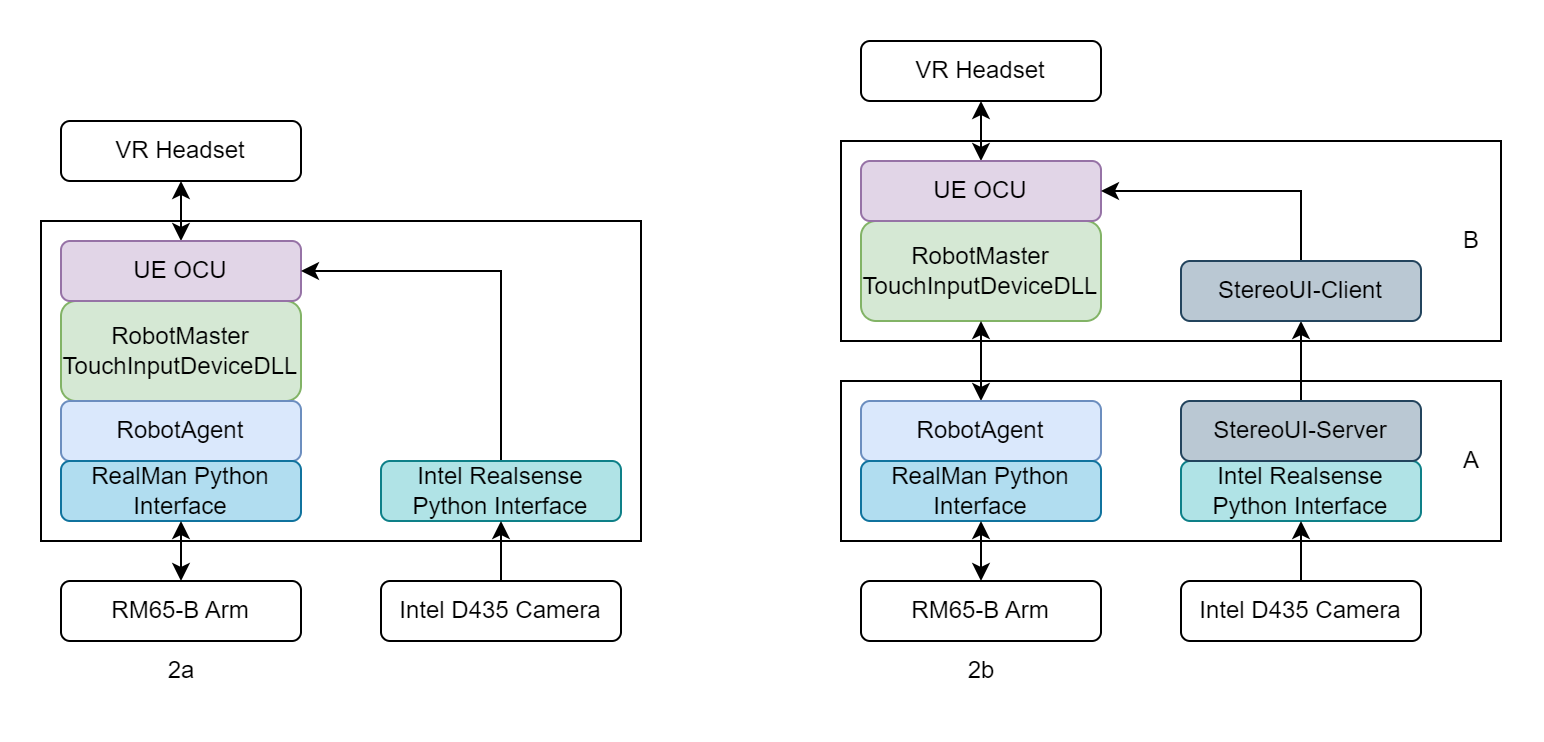
2a. Local Control with VR
This setup connects a laptop directly to the robot and is ideal for lab-based development.
Required Equipment
- Laptop with an NVidia graphics card
- RealMan RM65-B Arm
- 24V 600W DC Power Supply
- RobotIQ 2F-85 Adaptive Gripper
- U2D2 RS485 to USB Adapter
- Intel RealSense D435 Depth Camera
- Oculus Quest 3
Make sure the robotic arm and camera are securely mounted to a stable surface to prevent damage. Additional accessories such as USB and Ethernet hubs may be needed depending on your setup.
Configuration Steps
RobotOCUAndRobotSim_Release\bin\RealManDefinitionFiles\RealMan_RM65.prp
# if you are mounting the arm at a different angle, you will need to change the mounting orientation matrix. This default is for an arm mounted at 45 degrees.
RightArmBaseFromMount0 =  0.00000,        -1.00000,         0.00000,         0.0000
RightArmBaseFromMount1 = -0.70711,         0.00000,        -0.70711,        10.0000
RightArmBaseFromMount2 =  0.70711,         0.00000,        -0.70711,         0.0000
RightArmBaseFromMount3 =  0.00000,         0.00000,         0.00000,         1.0000
RobotOCUAndRobotSim_Release\bin\RobotAgent.prp
# if you are only using one arm, for example just the right arm, you need to disable the other arm.
SimulateLeftArm = 1

# we need to enable the real gripper.
UsingRobotiqTwoFingerGripper = true

# if you do not know the port the gripper is plugged into, you can use the RobotIQ user interface (free download) to find it. https://blog.robotiq.com/hubfs/support-files/RUI-2.4.9_20221206.zip
RightGripperComPort = COM4
RobotOCUAndRobotSim_Release\bin\Master.prp
# you'll probably want to change the camera coord frame based on the location of the camera to face
Camera1_Frame0 =  1.00000,         0.00000,         0.00000,         0.0000
Camera1_Frame1 =  0.00000,         1.00000,         0.00000,         0.0000
Camera1_Frame2 =  0.00000,         0.00000,         1.00000,         0.0000
Camera1_Frame3 =  0.00000,         0.00000,         0.00000,         1.0000
RobotOCUAndRobotSim_Release\UDPRobotControlPython\RealMan\realman_config.ini
# if you changed the IP address of your arm, modify it here.
host=192.168.1.18
SuperDex_interface\apps\realsense_SuperDex\config.ini
# you will have to modify the camera0 device id to match the one of your camera. This can be found using the realsense viewer app https://github.com/IntelRealSense/librealsense/releases/latest
[camera0]
device_id=829212071278
.\RobotSim.ini
# if you are only running one arm, disable the other in this file. This will stop the ghost arm from causing error messages
DisableLeft = 1
Run the System
Connect the VR headset to the PC and enter Quest Link. The headset should be inside the Link menu, with a grey grid extending into infinity.
Run the RealSense wrapper. Using the
dexmanConda environment, start the python scriptSuperDex_interface\apps\realsense_SuperDex\realsense_to_sui.py. The camera should load and ifpreview=Truein the config file, you should see the data streaming in.Power on the arm. The arm takes roughly 45-60 seconds to fully power on, even after the relays click on and energize the motors. The full web server at http://192.168.1.18 must be running to interface.
Run the RealMan wrapper. This requires setup found in
RobotOCUAndRobotSim_Release\UDPRobotControlPython\README.mdfor the Conda environment. Then, you cancdinto the source directory and runRobotOCUAndRobotSim_Release\UDPRobotControlPython\RealMan\main.py. The script will start up and be in control of the arm.If using two arms, run two instances of the wrapper with separate IP addresses.
Double-click
RobotOCUAndRobotSim_Release\Run RobotAgent.bat. RobotAgent will connect to the RealMan wrapper.Double-click
RobotOCUAndRobotSim_Release\Run MasterPipe.bat. Robot Master will start, with the connection to Unreal engine ready.RobotOCUAndRobotSim_Release\Run OCU Only.batto start the OCU.In VR, wait for the menu to load. Click the approach button to bring the real robot to approach and then click the Normal Mode button to bring it to Ready.
Press and hold the X button on your left controller to engage the clutch. Move the arms around and such.
2b. Remote Control Over VPN
This setup enables remote operation, useful for demos or field testing.
System Layout
- Computer A: Connected to robot and cameras, acts as VPN server
- Computer B: Connected to VR headset, acts as VPN client
Required Equipment
- All equipment from section 2a
- Second laptop with an NVidia graphics card
Configuration
Start with configuration from section 2a.
VPN Setup
To establish a secure connection between the two computers, use WireGuard (https://www.wireguard.com/). Install the GUI client on both machines. Configure Computer A as the server and generate a client configuration for Computer B.
After setup, you should have:
- A public IP address for Computer A that is accessible from the internet. If you do not use a VPN, this IP must be exposed without firewall restrictions.
- Internal VPN IP addresses for both machines, defined in the WireGuard configuration files.
IP Configuration Example We will be using the following IP addresses in the configuration files below:
- Computer A: 192.168.137.1
- Computer B: 192.168.137.2
Ensure all necessary firewall rules are open to allow communication.
File: realman_config.ini (Computer A) RobotOCUAndRobotSim_Release\UDPRobotControlPython\RealMan\realman_config.ini
ip=192.168.137.1File: RobotAgent.prp (Computer A) A:\RobotOCUAndRobotSim_Release\bin\RobotAgent.prp
# where we are sending/recieving the UDP commands - this is on the same computer so this is just Computer A address.
UDPmsgMCLocalIPAddress = 192.168.137.1
UDPmsgMCRemoteIPAddress = 192.168.137.1

# their IP
MasterIPAddress = 192.168.137.2

# our IP
AgentIPAddress = 192.168.137.1
File: StereoUI.prp (Computer A) A:\RobotOCUAndRobotSim_Release\bin\StereoUI.prp
# lets use the Z3 api because the shared texture ones expect a destination.
Camera-0   Z3-0
Camera-1   Z3-1

# for camera config, nothing matters except for these two lines: the calibration file and the texture we are listening for.
# the calibration is a null calibration, but you can create these if you want to warp the image.
# the texture must match what the realsense is writing to in SuperDex_interface\apps\realsense_SuperDex\config.ini
Z3-0.calibrationFile data\cam0000.cal  0
Z3-0.sharedTextureOut TaurusCameraOutLeft       //to OCU
Z3-1.calibrationFile data\cam0000.cal  1
Z3-1.sharedTextureOut TaurusCameraOutRight       //to OCU

# this line tells SUI server to start.
VideoServer	8554 30 10 4  0  #port max-fps kbps, network-latency debug
File: Master.prp (Computer B) B:\RobotOCUAndRobotSim_Release\bin\Master.prp
# our IP
MasterIPAddress = 192.168.137.2

# their IP
AgentIPAddress = 192.168.137.1
File: StereoUI.prp (Computer B) B:\RobotOCUAndRobotSim_Release\bin\StereoUI.prp
Camera-0   Z3-0
Camera-1   Z3-1
Z3-0.ip     192.168.137.1
Z3-0.url 	suisp://%s:8554
Z3-0.sharedTextureOut TaurusCameraOutLeft
Z3-1.ip     192.168.137.1
Z3-1.url 	suisp://%s:8554
Z3-1.sharedTextureOut TaurusCameraOutRight
Running the System
On Computer A
Run the RealSense wrapper. Using the
dexmanConda environment, start the python scriptSuperDex_interface\apps\realsense_SuperDex\realsense_to_sui.py. The camera should load and ifpreview=Truein the config file, you should see the data streaming in.Power on the arm. The arm takes roughly 45-60 seconds to fully power on, even after the relays click on and energize the motors. The full web server at http://192.168.1.18 must be running to interface.
Run the RealMan wrapper. This requires setup found in
RobotOCUAndRobotSim_Release\UDPRobotControlPython\README.mdfor the Conda environment. Then, you cancdinto the source directory and runRobotOCUAndRobotSim_Release\UDPRobotControlPython\RealMan\main.py. The script will start up and be in control of the arm.If using two arms, run two instances of the wrapper with separate IP addresses.
Double-click
RobotOCUAndRobotSim_Release\Run RobotAgent.bat. RobotAgent will connect to the RealMan wrapper.Double-click
RobotOCUAndRobotSim_Release\Run StereoUI.batand start the stream. Both camera feeds should be visible.
On Computer B
Double-click
RobotOCUAndRobotSim_Release\Run StereoUI.batand start the stream. If the network stream is working, the cameras should show up.Double-click
RobotOCUAndRobotSim_Release\Run MasterPipe.bat. Robot Master will start, with the connection to Unreal engine ready.RobotOCUAndRobotSim_Release\Run OCU Only.batto start the OCU.In VR, wait for the menu to load. Click the approach button to bring the real robot to approach and then click the Normal Mode button to bring it to Ready.
Press and hold the X button on your left controller to engage the clutch. Move the arms around and such.